Ever wanted to add an extra outlet in your home but thought, “Electricity and I aren’t exactly best friends”? Well, fear not! With a little patience, the right tools, and a healthy respect for safety, you can install an electric outlet without turning yourself into a human lightning rod. Follow these steps to get it done safely and efficiently!
What You’ll Need
- A new electrical outlet (15A or 20A, depending on your circuit)
- Outlet cover plate
- Wire stripper
- Voltage tester
- Screwdrivers (flathead and Phillips)
- Electrical tape
- Needle-nose pliers
- Wire nuts (if needed)
- A trusty flashlight (if you’re working in a dark area)
Step 1: Safety First! Turn Off the Power
Find your home’s electrical panel and shut off the breaker that controls the circuit where you’ll be installing the outlet. If you’re unsure, turn off the main breaker (just be prepared to work without lights). Use a voltage tester on the existing wires to confirm they’re not live before proceeding. If the tester lights up or beeps, do NOT continue until you figure out which breaker to shut off.
Step 2: Choose the Right Location
If you’re replacing an old outlet, your job is a bit easier—just remove the cover plate and unscrew the old outlet. If you’re installing a new one, pick a spot near an existing outlet or power source to simplify wiring. Be sure to follow local electrical codes for placement!
Step 3: Run the Wiring
If you’re adding a brand-new outlet, you’ll need to run new wiring from an existing power source. This might involve fishing cable through walls, so be sure to check for studs or obstacles before drilling holes. If you’re unsure, consult an electrician before you start drilling into your house like a DIY warrior.
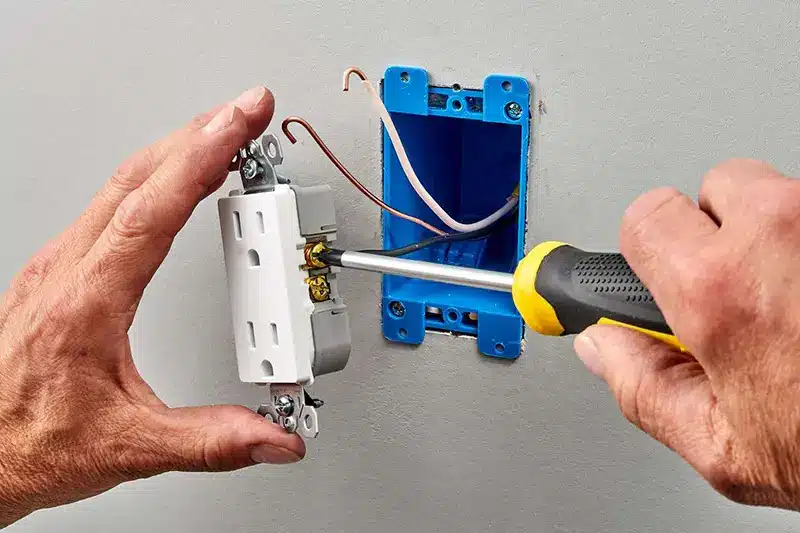
Step 4: Connect the Wires
You’ll find three types of wires:
- Black (hot): Connect this to the brass terminal screw on the outlet.
- White (neutral): Connect this to the silver terminal screw.
- Green or bare copper (ground): Connect this to the green grounding screw.
Use your wire stripper to remove about 3/4 inch of insulation from the wires before wrapping them around the screws. Tighten the screws securely and double-check your connections. If your outlet has push-in connectors, avoid using them—screw terminals make for a more secure connection.
Step 5: Secure the Outlet
Gently tuck the wires back into the electrical box, making sure nothing is pinched or too tight. Secure the outlet with the provided screws, then attach the cover plate. (Bonus tip: Don’t overtighten the cover plate screws unless you enjoy cracked plastic!)
Step 6: Restore Power and Test
Head back to your breaker box and flip the power back on. Use a voltage tester to confirm that the outlet is working correctly. If all looks good, grab a lamp or phone charger and plug it in to make sure everything is functioning as expected.
Safety Reminders:
- If you feel uncomfortable at any step, call a licensed electrician. It’s better to be safe than sorry!
- Never work on live wires—always double-check with a voltage tester.
- Follow local building codes and permit requirements for electrical work.
- If something sparks, smells funny, or doesn’t work after installation, turn off the power and recheck your connections.
Hopefully You Survived!
Congratulations! You’ve just installed an electric outlet like a true DIY champion. Now you can plug in that extra lamp, phone charger, or fancy espresso machine without searching for an open outlet. Just remember: safety first, and when in doubt, call in the pros. Happy wiring!